Pi-Connect Lite
Introduction
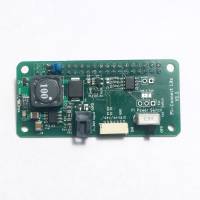
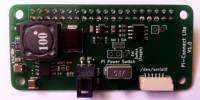
The Pi-Connect Lite is a HAT addon board for the Raspberry Pi 2B/3B/4/Zero(2,W) that allows easy and reliable interfacing with popular flight controllers used in unmanned vehicles.
It removes the complexity and risk of wiring up the telemetry and power connectors between the Pi and the vehicle systems.
It has been designed with reliability and a small form factor at the forefront, allowing for it to be used in both the smallest and largest of vehicles.
Features
The Pi-Connect features:
- High current power supply
- Wide input voltage (7 - 30V)
- Reverse input protection
- ESD protected
- Supplies a full 5.1V at 3.5A for the Pi and accessories
- Overcurrent protection
- Short circuit protection
- Low EMI (Version 1.2+)
- 1x Telemetry (serial) port using a JST-GH 6-pin Dronecode standard connector
- Additional UART port (Pi 4 only) (Version 1.4+)
The board also features a power switch which safely switches off the Pi via issuing a shutdown signal. This ensures the Pi is cleanly shutdown and reduces the risk of system corruption.
Requirements
The Pi-Connect requires the following equipment:
- Power source of 7-30V, capable of supplying at least 15W
- Raspberry Pi 2B, 3B, 4, Zero, Zero W, Zero2 running the Raspian OS.
- Flight controller running Ardupilot/PX4. A telemetry cable with a JST-GH plug is needed to plug into the Pi-Connect. Cables with JST-GH/JST-GH and DF13/JST-GH plugs are available on the webstore.
Specifications
General
| Specification | Value | Notes |
|---|---|---|
| Operating Temperature | -25° - 70° C |
Standards Compliance
The Pi-Connect Lite is compliant with the following standards:
- Raspberry Pi uHat standard
- Pixhawk connector standard
- Designed to meet CISPR22 Part B EMC standard (Version 1.2+)
- RoHS compliant (Version 1.2+)
Power Supply
| Specification | Value | Notes |
|---|---|---|
| Absolute maximum input voltage | 30V | Exceeding this voltage may damage the Pi-Connect |
| Maximum input voltage | 7V | The Pi-Connect may work below this input voltage, but it is not guaranteed |
| Output voltage variation (Vpp) | 0.35V | Variation is larger at higher input voltages |
| Efficiency (30V input) | >84% | |
| Efficiency (18V input) | >90% | |
| Power dissipated (max) | 2.5W |
The power supply is based on the TPS54360 (or TPS54360B in Version 1.2+) DC/DC converter.
Setup
Hardware Setup
The Pi-Connect's power input needs to be soldered to the appropriate power source. The cables can be either soldered directly to the board, or the Power Cable Set can be soldered for a removable cable.
Next the board should be mounted onto the Pi's 40-pin connector such that the telemetry and power connectors face towards the interior of the Pi.
The telemetry connector should be connected to the flight controller. The pinout of the JST-GH connector allows for direct connection to the flight controller without any crossover cables required.
Software Setup
Some configuration is required to configure the power switch actions and serial port.
A reboot will be required for the changes to take effect.
Raspberry Pi OS
/boot/firmware/config.txt, not /boot/config.txt
Insert the following text into /boot/config.txt:
# Power switch
dtoverlay=gpio-shutdown
dtoverlay=gpio-poweroff
Then run the following command to enable the serial port if not running on a Pi 5:
sudo raspi-config nonint do_serial 2
On a Pi 5, instead insert the following text into /boot/formware/config.txt:
dtparam=uart0=on
To enable the additional UART(4) on the Pi4, insert the following text into /boot/config.txt:
dtoverlay=uart4,ctsrts
To enable the additional UART(4) on the Pi5, insert the following text into /boot/firmware/config.txt:
dtoverlay=uart3-pi5,ctsrts
Ubuntu 20
In /boot/firmware/syscfg.txt, modify the line dtparam=i2c_arm=on to dtparam=i2c_arm=off.
Insert the following text into /boot/firmware/usercfg.txt:
# Power switch
dtoverlay=gpio-shutdown
dtoverlay=gpio-poweroff
Ubuntu 22
In /boot/firmware/config.txt, modify the line dtparam=i2c_arm=on to dtparam=i2c_arm=off.
Insert the following text into /boot/firmware/config.txt:
# Power switch
dtoverlay=gpio-shutdown
dtoverlay=gpio-poweroff
Using
Power switch
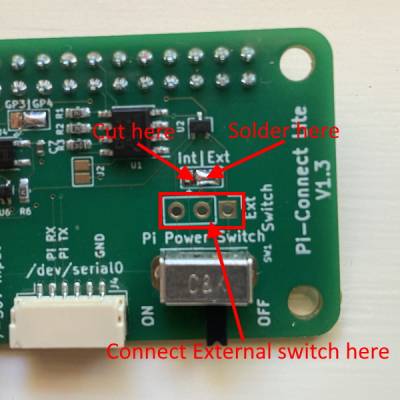
The power switch performs a safe software shutdown of the Raspberry Pi before cutting power. The switch can be internal (the default, on board) or external (off board).
Fitting an external switch is useful in cases where the Pi-Connect is mounted in a difficult-to-reach location. A switch can instead to mounted in a better location and then wired to the external switch port on the Pi-Connect Lite.
If an external power switch is desired, ensure the switch is connected to the Ext Switch ports on the
Pi-Connect Lite board and the Int|Ext trace is cut on the Int side and soldered on the Ext side.
The switch must be of a latching type with the centre pin common, like these switches.
To restore the functionality of the internal switch, restore the cut/solder of the Int|Ext to the original state.
I2C Conflict
By default, the power switch uses GPIO3. As I2C also uses this port, there is a conflict.
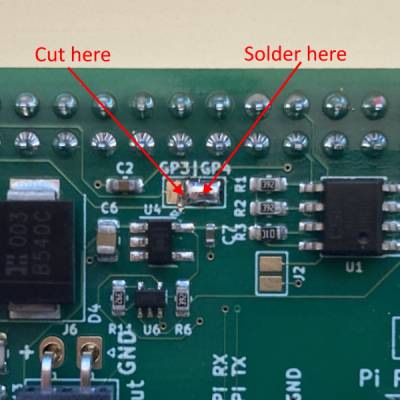
On the Pi-Connect Lite V1.3 (or later), this can be resolved by moving the power switch to use GPIO4. This can be achieved by changing the GP3|GP4 jumper on the Pi-Connect Lite. The trace should be cut on the GP3 side and soldered on the GP4 side, as shown below.
Then, change the dtoverlay=gpio-shutdown line to dtoverlay=gpio-shutdown,gpio_pin=4 in /boot/config.txt (or /boot/firmware/usercfg.txt or /boot/firmware/config.txt in Ubuntu)
If GPIO3 is preferred, reverse the jumper and software configuration changes back to defaults.
UART Pinouts
In the Raspberry Pi OS, the UART is identified as /dev/serial0, or /dev/ttyAMA0 on the Pi 5:
Pin 1 is on the left-hand side when looking at the top of the board.
| Pin | Function |
|---|---|
| 1 | NC |
| 2 | Pi Rx |
| 3 | Pi Tx |
| 4 | NC |
| 5 | NC |
| 6 | Ground |
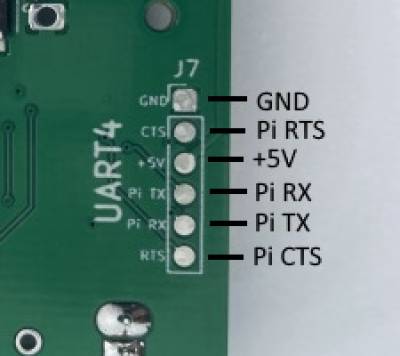
The additional UART(4) on the underside of the Pi-Connect Lite (V1.4+) is identified as /dev/ttyAMA* (where * is 1, 2 or 3) and has the following pinout:
Raspberry Pi Pins Used
The Pi-Connect uses the following Pins on the 40-pin header of the Raspberry Pi:
| Pin | Alt Name | Function |
|---|---|---|
| 2 | +5V | |
| 4 | +5V | |
| 5 | GPIO3 | Power Switch |
| 7 | GPIO4 | Power Switch (alt) |
| 8 | GPIO14 | Pi Serial Tx |
| 10 | GPIO15 | Pi Serial Rx |
| 19 | GPIO10 | UART4 CTS (Pi4 only) |
| 21 | GPIO9 | UART4 RX (Pi4 only) |
| 23 | GPIO11 | UART4 RTS (Pi4 only) |
| 24 | GPIO8 | UART4 TX (Pi4 only) |
| 27 | EEPROM | |
| 28 | EEPROM | |
| 37 | GPIO26 | Power Switch |
(This does not include the ground pins, all of which are connected to the Pi-Connect board)
Power Port
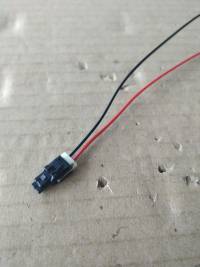
The power port is a 2-pin Molex Nano-fit. The connector is Molex part number 1054301102 and corresponding plug is Molex part number 1053071202.
More information about the Nano-fit product family can be found at the Molex website.
Software
Note that it is not necessary to install any additional software to get the Pi-Connect working.
The following packages are ready-to-go for new users or those who want a ready-made solution:
Versions
The following is a changelog of the hardware revisions of the Pi-Connect Lite. The revision numbers are printed on the top side of the board.
V1.5
V1.4
V1.3
V1.2
- Changed to TPS54360B power converter, as TPS54360 is end-of-life
- Added EMC filter designed to meet CISPR22B EMC standard
- RoHS compliant
- Added ESD protection for power switch
- Added 5.1V power output port
V1.1
- Swapped locations of the telemetry port and power switch
- Better spacing layout of power supply components to simplify manufacturing
- Added text labels to components
- Added capacitor to power switch
V1.0
Known Issues
| Issue | Affected Boards | Resolution |
|---|---|---|
| Power switch does not work after enabling I2C | V1.0 - V1.2 | Enable GPIO4 for power switch for V1.3+ (see I2C conflict section) |
| External switch does not work when used with long cable | V1.0 | Add a 0.1uF capacitor between ground and GPIO3 |
The shutdown command sudo shutdown does not work | All | Use the physical switch on the Pi-Connect to shut down the Pi |
